Haiku komut satırı uygulamaları
| Konum: | /boot/system/bin/ /boot/system/non-packaged/bin/ ~/config/bin/ ~/config/non-packaged/bin/ |
Haiku ile gelen tüm komut satırı uygulamaları /boot/system/bin/ konumunda yüklüdür. Kendinizin veya sonradan yüklediğiniz .hpkg komut satırı uygulamaları da ya orada ya da ~/config/bin/ konumunda bulunur. Bu konumların dışında /boot/system/non-packaged/bin/ veya ~/config/non-packaged/bin/ konumlarına da uygulamalar yüklenebilir. Tüm bu konumlar PATH değişkenine dahildir ve kendiliğinden bulunurlar.
Aşağıda Haiku'ya özel komut satırı uygulamalarının ortalama bir listesini görebilirsiniz, bu liste tüm uygulamaları kapsamamakta olup en kullanışlı olanları listeler. bin/ klasöründeki uygulamalara bakıp onlarla oynamaktan çekinmeyin. Bir uygulamayı --help parametresi ile başlatmak o uygulamanın seçeneklerini ve kullanımı ile ilgili bilgiyi görüntüler.
 Özniteliklerle ilgili: listattr, catattr, addattr, rmattr, copyattr
Bu komutlar dosyaların özniteliklerini görüntüleme, okuma, ekleme ve çıkarma ile ilgilidir. Bu üstveri bilgisi yalnızca BFS ile biçimlendirilmiş disk bölümlerinde kullanılabilir. Bu dosyaları başka dosya sistemi ile biçimlendirilmiş bir diske taşımak tüm bu özniteliklerin kaybolmasına neden olur!
Tüm bu komutlar Uçbirim öznitelikleri bölümünde açıklanmıştır.
İndeks ile ilgili: lsindex, mkindex, reindex, rmindex
Bu komutlarla BFS indeksinin özniteliklerini listeleyebilir, yapabilir, yeniden indeksleyebilir veya kaldırabilirsiniz. Her disk bölümünün kendi özel indeksi vardır, bunu lütfen bir disk bölümünden bir başkasına dosya kopyalarken unutmayın.
Bu komutlar İndeks bölümünde açıklanmıştır.
Paket yönetimi ile ilgili: package, pkgman
package komutu HPKG paketlerini yönetmede kullanılır. Temel kullanımı öğrenmek için Installing applications makalesine bir göz atın. Genellikle haikuporter uygulaması kullanılarak "tarif" adı verilen programcıklarla paketler oluşturulur.
pkgman komutu paketleri aramak, yüklemek, güncellemek ve kaldırmak için kullanılır. Paket depoları eklenebilir, çıkartılabilir ve içlerindeki paketlerin listesi güncellenebilir. full-sync komutu kullanılarak daha agresif bir güncelleme yöntemi izlenebilir; bu komut gerektiğinde paketleri kaldırır veya eski bir sürümüne indirebilir.
Bir parametre hakkında daha fazla bilgi için "--help" bayrağını ekleyin, örn. pkgman search --help.
Betik yazımı için kullanışlı komutlar
Aşağıda özellikle betik yazımında çok kullanılan komutların bir listesini bulabilirsiniz (ayrıca bkz: Bash ve betik yazımı).
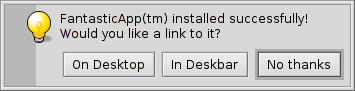
alert | alert komutu bildiğimiz uyarı penceresini gösterir; pencerede öntanımlı bir simge, açıklama metni ve üç taneye kadar düğme bulunur. Basılan düğmenin başlığını ve bir çıkış kodu döndürür (0 ile başlar). Örneğin: alert --idea "FantasticApp(tm) başarıyla yüklendi! \ Bir bağlantı yapılmasını ister misiniz?" "Masaüstü'nde" "Masaüstü Çubuğu'nda" "Kalsın, almayayım"
| |
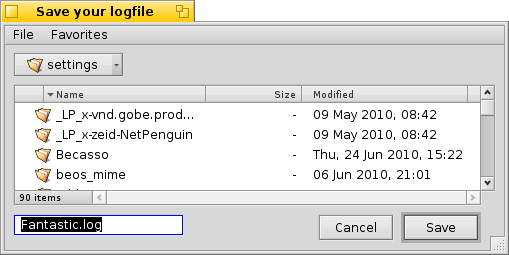
filepanel | filepanel bir yükle veya kaydet paneli görüntüler ve kullanıcının bir dosya veya konum seçmesine olanak verir. Dönüş değeri olarak seçili dosyayı veya konumu döndürür. Parametre olarak bir başlangıç dizini, pencere başlığı veya bir dosyayı kaydederken veya sınırlandırırken öntanımlı bir ad verebilirsiniz. Aşağıdaki görsele ulaşmak için örnek olarak bu komutu kullanabilirsiniz: filepanel -s -t "Save your logfile" -d ~/config/settings -n Fantastic.log
| |
hey | hey, uygulamalara BMessage gönderen ve yanıtlarını yazdıran ufak bir yardımcı izlencedir. Bir uygulamayı betik yardımıyla veya komut satırından kullanılmasına (diğer bir tanımla uzaktan denetimine) izin verir. Kullanımı biraz karmaşık gelebilir; ancak Humdinger'in günlük yazısı iyi bir başlangıç materyali olabilir. Chris Herborth tarafından yazılan çok daha ayrıntılı bir hey öğreticisi de BeBook içinde bulunmaktadır. | |
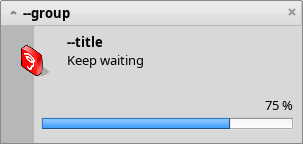
notify | notify shows a notification panel with a message. There are various parameters that are described when you call notify --help. A notification can also be used to show the progress of some action. When doing that, it's important to set a messageID and always use it when you update the progress (a float between 0.0 and 1.0 that's printed as percent). Otherwise you'll see several notification panels if you update quicker then the set timeout. notify --type progress --group "--group" --title "--title" --icon /boot/home/bebook.hvif \ --messageID MyMessageID --progress .75 "Keep waiting"
| |
query | query is the commandline version of the Find panel. In fact, a quick way to generate the search term is to build a query in the Find panel, switch to , add double quotes (") in front and back and paste the whole string after your query command in Terminal or your script. | |
waitfor | waitfor is a nice way to wait for a particular application or thread to be started or to have ended. |
Diğer komutlar
checkfs | checkfs is an important tool to check for errors in your file system. Simply add a volume name like /Haiku or device path and it'll run through every file and correct inconsistencies where possible. | |
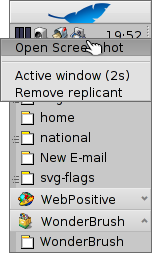
desklink | desklink can install an icon for any file, folder, query or application in the Deskbar tray. It also offers the option to provide a context menu when right-clicking an icon to execute special actions. As an example, try this to add the commandline app screenshot with various options (the "\" in the first line is just for the line break in Terminal): desklink "cmd=Active window (2s):/bin/screenshot --window --border --delay 2" \ "cmd=Remove replicant:desklink --remove=screenshot" /bin/screenshot
| |
diskimage | diskimage lets you register a regular file as disk device. For example, you can register a Haiku anyboot image, mount it in Tracker and copy, edit or remove files there before using it as source in the Installer. | |
launch_roster | The launch_daemon starts all sorts of services and applications at boot-up. For some it was instructed to re-start them if they were quit. If you don't want that – maybe you'd like to test a modified Tracker, for example – you use launch_roster to stop the re-starting of the application before quitting it. Similarly, you can start it again or get info about it.c The parameter log prints out a log of all launch_daemon related events. launch_roster stop x-vnd.be-tskb | |
mountvolume | mountvolume is preferred by many to mount local partitions and disks, because its usage is so easy: just call it with the name of the partition and you're done. Try --help for more options. mount can additionally mount remote disks by using a network filesystem, like NFS4. You specify the used filesystem with the -t parameter and the remote location with the -p parameter. As filesystem parameter you can use anything you find in /system/add-ons/kernel/file_system (and corresponding file hierarchies under ~/config or "non-packaged", of course). You also have to create a folder as mountpoint. Here's an example: mkdir -p /DiskStation mount -t nfs4 -p "192.168.178.3:volume1" /DiskStation | |
open | open is a very handy little tool. With it you open any file with its preferred application, or start a specific application by its signature without the need to know its exact path. It also works with URLs and even with the "virtual" directories . for the current directory and .. for the parent, opening the folder in Tracker. | |
ramdisk | A ramdisk is like a harddisk running only in the computer's memory. That makes it very fast but also volatile, because its contents vanishes when you shut down the computer, or it crashes or you experience a blackout. ramdisk create -s 1gb mkfs -q -t bfs /dev/disk/virtual/ram/0/raw RAMses mountvolume RAMses Note: When creating a ramdisk, the ramdisk command prints out the path to it. If you create several disks, that path /dev/disk/virtual/ram/0/raw will change! To preserve the contents, at least if no calamity like a blackout etc. strikes, a ramdisk can be set up to read/write an image on the harddisk. For that, you need to supply a file of the desired size that will be read from every time you start your ramdisk, and written to when you unmount it. To create an image file "RAMimage" of 500MiB and format it, do this: dd if=/dev/zero of=RAMimage bs=500M count=1 mkfs -q -t bfs /dev/disk/virtual/ram/0/raw RAMimage From now on, you start the ramdisk like this: ramdisk create RAMimage mountvolume RAMimage It's very important to always cleanly unmount you ramdisk, either from Tracker or with unmount /RAMimage, or the changes won't be written back to the image file! |